EseeCloud Camera Setup Guide — First-Time Configuration
Setting up an EseeCloud camera for the first time takes about 5 minutes. This guide covers every scenario: scanning a QR code, adding without a code, connecting via WiFi, and setting up a wireless NVR Kit. Follow the method that matches your situation.
Using a PC instead of a phone? This guide covers the mobile app (Android/iOS). For the Windows CMS desktop client, see the Windows Setup Guide.
Before You Start — Prerequisites
Make sure all of the following are ready before you begin. Most setup failures trace back to one of these being missed.
| Requirement | Details |
|---|---|
| EseeCloud app installed | Download for free: Android (Google Play) · iOS (App Store). Not sure you have the latest version? Check the download page. |
| Camera powered on | Plug in the camera and wait ~30 seconds. The indicator light should flash, signaling configuration mode. If the light is solid or off, hold the reset button for 3 seconds until it starts flashing. |
| 2.4 GHz WiFi network | EseeCloud cameras support 2.4 GHz only. 5 GHz WiFi will not work. See the WiFi section below for details. |
| App permissions granted | The app needs camera (for QR scanning), WiFi/location, and notification permissions. On Android, go to Settings → App Management → EseeCloud to enable them if prompted. |
| Logged in or "Local Experience" | You need to be signed in to save devices to your account. If you haven't registered yet, see the Login & Registration Guide. |
Method 1: Add Camera by Scanning the QR Code
Use this method if your camera has a QR code sticker on the body or on the included quick-start card.
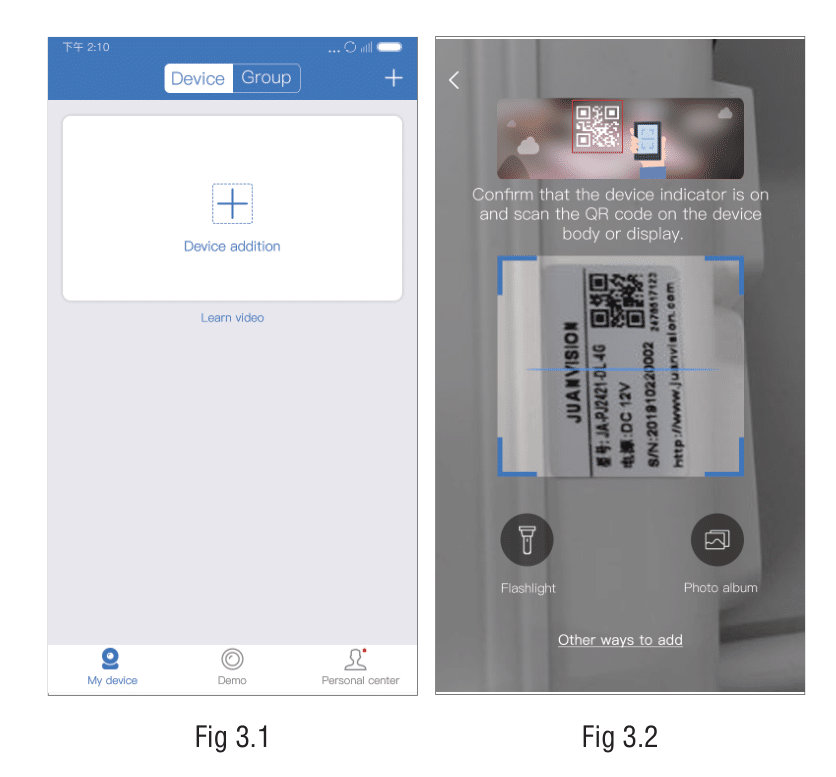
Step 1 — Open the Add Device screen
- Log in to the EseeCloud app.
- On the Device List, tap the "+" button in the top-right corner.
- The app opens the QR Code Scanning interface.
Step 2 — Choose: is your camera already connected to the internet?
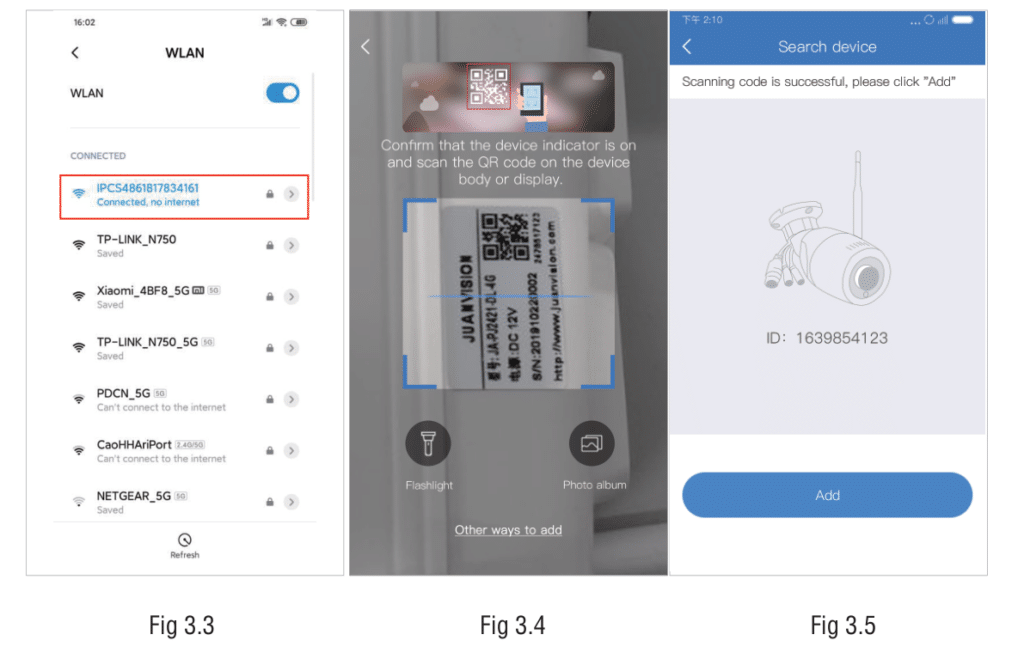
Not yet connected (new camera, no WiFi set up yet):
- Go to your phone's WiFi settings and connect to the camera's hotspot. The hotspot name starts with IPC (e.g.,
IPC_XXXXXX). The default hotspot password is11111111(eight ones). - Keep the hotspot connection active and return to the EseeCloud app.
- Point the camera at the QR code on your device — a search screen appears showing the device ID. Tap Add.
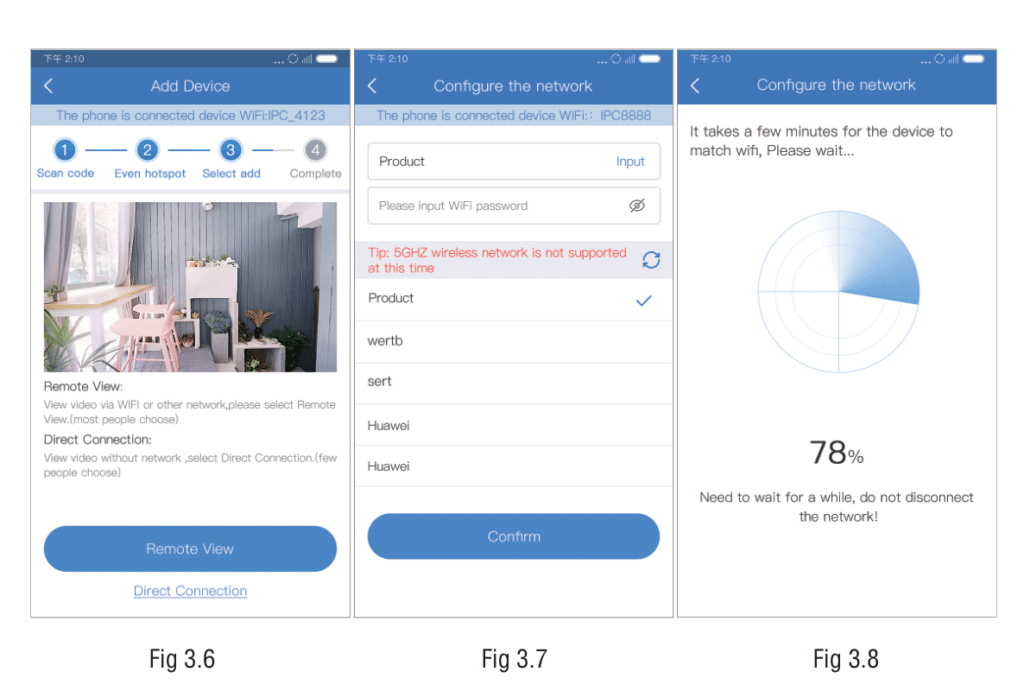
- Choose how you want to use the camera:
- Remote View — view the camera from anywhere over the internet (recommended). The app shows a list of nearby WiFi networks. Select your home WiFi (2.4 GHz), enter the password, and tap Connect. The camera will connect to your router and come online.
- Direct Connection — view the camera only when your phone is on the same local network, without configuring internet access.
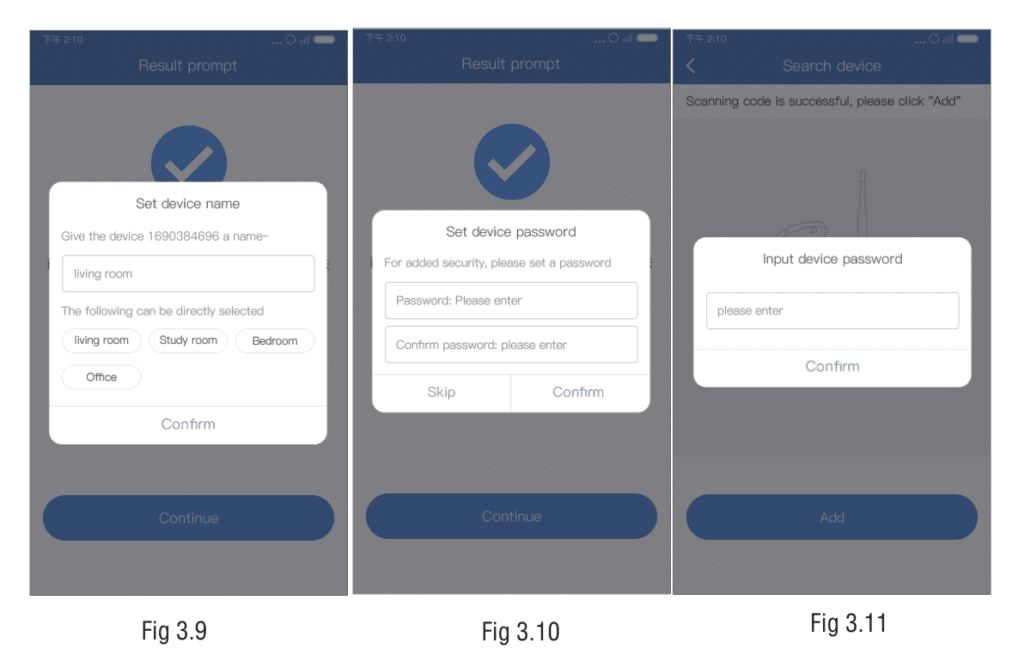
- Set a device name and a device password when prompted. Tap Complete. The camera appears in your device list.
Already connected to your router via ethernet or previous setup:
- Scan the QR code on the device. The search screen shows the device ID — tap Add.
- Enter the device name and the device password (skip the password field if the device has no password set).
- Tap Complete. The camera is added.
Method 2: Add Camera Without a QR Code
If you cannot find a QR code on your camera or its packaging, use Other Ways to Add.
On the QR code scanning screen, tap "Other Ways to Add" (or "Can't find the device QR code?"). The app shows four options:
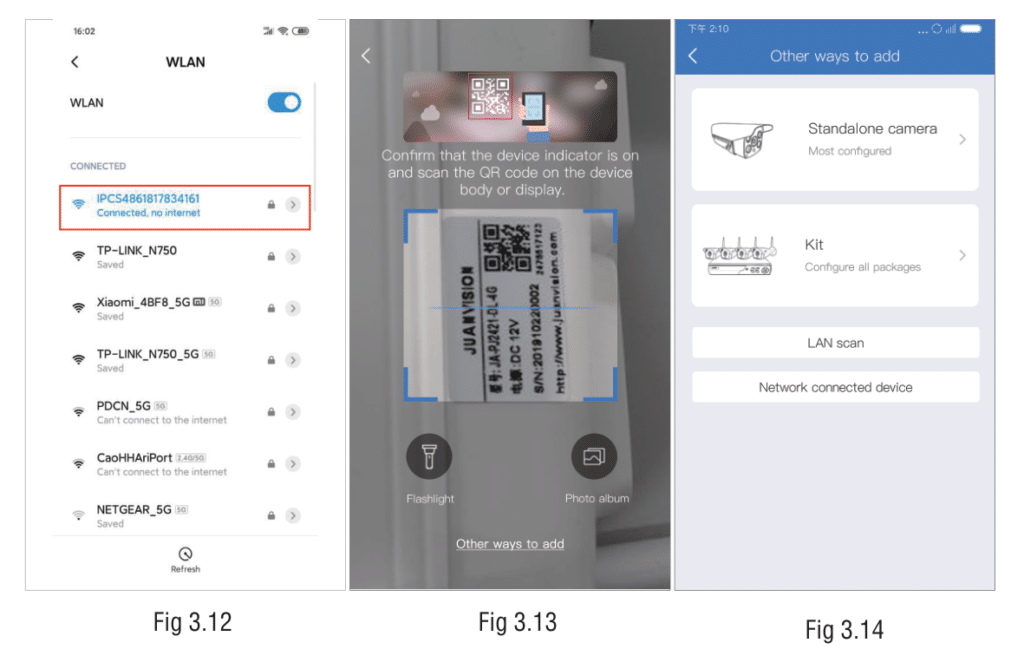
Option A — Standalone Wireless Camera (no QR, not networked)
- Go to your phone's WiFi settings and connect to the camera's IPC hotspot (default password:
11111111). - Return to the app and tap Other Ways to Add → Wireless Standalone Camera.
- The app automatically searches for nearby devices and shows your camera. Tap it, then tap Add.
- Follow the same WiFi configuration and device naming steps as in Method 1 (Remote View).
iOS note: On iPhone, the app will guide you to the phone's Settings to connect to the IPC hotspot manually, then return to the app to continue.
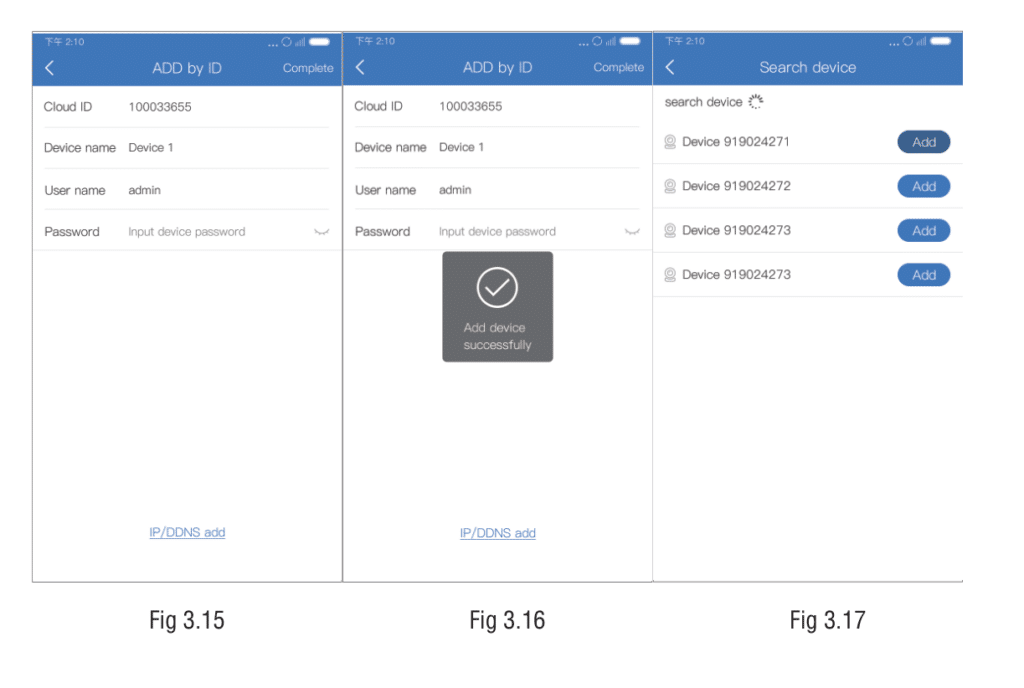
Option B — Networked Device (add by Device ID)
Use this if the camera is already connected to a router but has no QR code.
- Tap Other Ways to Add → Networked Device.
- Enter the Device ID — this is printed on the camera label, usually a 16–20 character code.
- Enter the device name and device password.
- Tap Complete in the top-right corner.
Option C — LAN Scan (same WiFi network)
Use this to discover cameras automatically when your phone and the camera are on the same network.
- Make sure your phone is connected to the same WiFi as the camera.
- Tap Other Ways to Add → LAN Scan.
- The app scans the local network and lists all discovered devices. Tap your camera's device ID.
- Enter the device name and device password, then tap Complete.
Setting Up a Wireless NVR Kit
An NVR Kit (Network Video Recorder with bundled cameras) is added differently from standalone cameras — the cameras pair wirelessly to the NVR, and you add the NVR unit to the app.
- Connect the NVR to your router using the included ethernet cable. The NVR needs an active internet connection.
- Power on the NVR and all bundled cameras.
- In the EseeCloud app, tap "+" → Other Ways to Add → KIT.
- Enter the Device ID printed on the NVR label, set a device name and device password.
- Tap Complete — all channels connected to the NVR appear in your device list as a single entry.
No WiFi configuration needed for the NVR. The NVR connects via ethernet, and the cameras communicate with the NVR over a private wireless channel. You do not need to enter your home WiFi password for an NVR Kit setup.
WiFi Requirements
This is the most common cause of setup failure.
EseeCloud cameras support 2.4 GHz WiFi only. The camera will not connect to a 5 GHz network, even if your phone connects to it just fine.
| Supported | Not supported |
|---|---|
| WEP | 5 GHz WiFi |
| WPA-PSK / WPA2-PSK | WPA/WPA2-Enterprise (corporate WiFi) |
| Open networks (no password) | Bridge mode WiFi |
| 2.4 GHz band | Static IP environments |
How to check and fix:
- Dual-band router: Many modern routers broadcast 2.4 GHz and 5 GHz under the same name (SSID). Log in to your router's admin page and separate them into two different SSIDs. Connect the camera to the 2.4 GHz one.
- Router MAC filtering: If your router has a whitelist/blacklist or MAC address filtering enabled, add the camera's MAC address (printed on the label) or disable the filter.
- Wrong WiFi password: Double-check the password. Avoid complex symbols and check for accidental spaces.
- Router DHCP disabled: The camera requires DHCP to get an IP address automatically. Make sure DHCP is enabled on your router.
Initial Device Setup — Name and Password
After adding any camera, the app prompts you to set:
- Device Name — a friendly label like "Front Door" or "Living Room". You can change this later in the device settings.
- Device Password — this is the camera's own access password (separate from your EseeCloud account password). It protects the camera from being added by others who know your device ID. Choose a strong, unique password and note it down — you will need it if you ever remove and re-add the device.
Default device passwords: For cameras added via hotspot, the default hotspot password is
11111111. The device password you set during setup is different — you create it yourself. If a camera already has a password set and you didn't set it, try the previous owner's password or perform a factory reset (hold reset button for 10 seconds).
What You Can Do After Setup
Once your camera is in the device list and shows Online, you have full access:
Live Preview
Tap the camera thumbnail to enter the Preview screen. Tap the full-screen icon to switch to landscape for a wider view. Use two-finger pinch gestures to zoom in and out.
Key controls in the preview toolbar:
| Control | Function |
|---|---|
| Screenshot | Saves a still image to your phone |
| Recording | Captures a video clip to your phone |
| Audio | Toggles the camera's microphone audio |
| PTZ (pan/tilt/zoom) | Appears on PTZ cameras — swipe or tap directional arrows to move the lens |
| Definition | Switches between HD and SD quality |
PTZ Camera Controls
If your camera has pan/tilt/zoom hardware, tap the PTZ button in the preview toolbar. From here you can:
- Swipe the control circle or tap arrow buttons to move the camera lens.
- Set preset positions ("frequently-watched positions") — up to 256 positions can be saved and recalled instantly.
- Enable cruise mode — the camera automatically rotates between your preset positions.
- Adjust PTZ speed using the speed level selector.
Video Playback
Tap the Playback button on the device card (or in the preview toolbar). Select:
- TF Card Video — plays recordings stored on the inserted SD card.
- Cloud Video — plays cloud-recorded footage (requires active cloud storage subscription).
Drag the timeline to jump to a specific time. Blue segments on the timeline indicate recorded periods.
Changing WiFi Network After Setup
If you move your camera to a new location with a different WiFi network:
- Open the device settings (tap the gear icon on the device card).
- Scroll to Device WiFi.
- Select the new 2.4 GHz network and enter the password.
- The camera disconnects briefly while it reconnects to the new network.
Alternatively, you can factory reset the camera (hold reset for 10 seconds) and add it again using the setup process above.
Common Setup Failures — Quick Checklist
| Symptom | Most likely cause | Quick fix |
|---|---|---|
| Camera indicator not flashing | Not in config mode | Hold reset button 3 seconds |
| App can't find device during scan | Not connected to IPC hotspot | Connect to IPC_XXXXX hotspot first |
| "Binding failure" / can't connect WiFi | 5 GHz or MAC filter | Ensure 2.4 GHz; disable MAC filter |
| "Device not online" after setup | Router DHCP off or no internet | Check router settings, ensure DHCP on |
| Wrong WiFi password error | Typo in password | Re-enter carefully; avoid special chars |
| Setup succeeded but camera shows Offline | Router too far away | Move camera closer to router |
For deeper troubleshooting — persistent offline status, black screen, or notification issues — see the EseeCloud Troubleshooting Guide.
Frequently Asked Questions
How many cameras can I add to one account?
There is no published hard limit. Users commonly manage 10–20 cameras from a single account without issues.
Can I add the same camera to multiple phones?
Yes. The recommended method is to use the Share Camera feature — the camera owner shares access to a second account or generates a share QR code. This avoids sharing your main account credentials and gives you control over what the shared user can do. See the Camera Sharing Guide.
What is the Cloud ID / Device ID?
The Device ID (also called Cloud ID in some menus) is your camera's unique P2P network identifier — a 16–20 character alphanumeric code printed on the camera label. It is used to add the device by ID and is required if you ever need to re-add the camera. Keep it noted somewhere safe.
My camera was working but went offline. What should I check first?
Check whether your home WiFi password or SSID changed recently (router replacement, ISP change, etc.). If so, reconfigure the camera's WiFi via the device settings. Also check that the camera is powered and the indicator light is on. For more, see the Troubleshooting Guide.
Does EseeCloud support cameras from other brands?
EseeCloud works with cameras from several brands that use the same P2P platform — including Hiseeu, Heimvision, Xmarto, and OOSSXX. It does not work with Wyze, Reolink, or other brands that have their own dedicated apps. See the Compatible Cameras page for the full list.
Next Steps
- Download EseeCloud → — Get the app or PC client if you haven't already.
- Windows CMS Setup → — Add and manage cameras from your Windows PC.
- Fix Camera Problems → — Camera offline, black screen, or notification issues.
- Share Your Camera → — Give family members access to your cameras.